- Turn off all power to the machine.
- Pull back the side cover of the control panel to view the dipswitches.
- Flip the bottom dipswitch (Labeled 1) to the On position.
- Turn the machine back on.
- Press SET one time.
- Press the down position arrow key until the cursor is flashing on #2 Main.
- Press SET.
- Remove the needle plate and the U shaped cover enclosing the rotary hookotate.
- Rotate the handwheel on the side of the machine in the direction of the arrow until the LCD Panel reads 201 degrees.
- Put in a brand new needle.
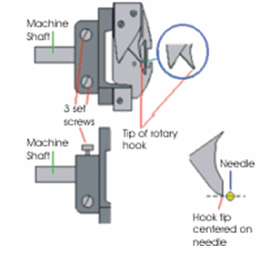
- Check that the tip of the rotary hook is centered behind the back of the needle.
- If it is centered, check the gap behind the needle and the rotary hook. The gap should be just large enough for a thread to go through. A gap that is too wide will cause looping. Too narrow will result in numerous thread breaks
If the gap or the rotary hook tip position is incorrect the machine should be timed. The two easiest needles to time are needle 1 or needle 15. Make sure you put in a brand new needle.

|
 |
- Loosen the three set screws on the rotary hook.
- Hold the rotary hook in position.
- Rotate the hand wheel until the LCD display reads 201 degrees.
- Hold the rotary hook firmly while making the necessary adjustments, then tighten one of the set screws.
- Rotate the hand wheel once again to 201 degrees to check the timing.
- If the timing is still incorrect, repeat steps 12-16
- Tighten the remaining set screws and then replace the U Shaped cover and needle plate on the machine.
- Turn off power to the machine, and then flip the bottom dipswitch to the Off position.
- Turn the machine on and resume stitching
|


